
Hey there, fellow business owners! It’s your friendly neighborhood AI enthusiast here, ready to dive into the exciting world of ChatGPT integration.
I’ll walk you through the entire process of integrating ChatGPT with your website in this guide. I’m here to offer thorough explanations and advice that will help you get started on the correct track, regardless of your level of experience as a developer or how new you are to the field of artificial intelligence (AI).
Are you prepared to improve user interaction and experience on your website even further?
Let’s get started!
Why Integrate ChatGPT on Your Website?
Before we get into the nitty-gritty of integration, let’s talk about why you might want to invite ChatGPT to your website’s party. Here are a few compelling reasons:
1. Improved User Engagement:
ChatGPT can keep your visitors entertained and engaged with intelligent, context-aware conversations. Say goodbye to boring static pages and hello to interactive awesomeness! With ChatGPT your visitors also get instant answers throughout the day.
2. 24/7 Customer Support:
Tired of answering the same questions over and over? Let ChatGPT handle the repetitive queries while you focus on the more complex issues. It’s like having a tireless, always-available customer support sidekick.
3. Personalized Recommendations:
ChatGPT can analyze user preferences and provide tailored suggestions, whether it’s product recommendations or content suggestions. It’s like having a personal shopper for your website visitors!
4. Enhanced User Experience:
With ChatGPT, you can create a more immersive and interactive user experience. Visitors can ask questions, get instant answers, and even enjoy a bit of witty banter. Who said websites have to be serious all the time?
5. Reduced Operational Costs:
By automating a significant portion of customer interactions, ChatGPT can help you trim down your operational expenses. It’s like having a cost-effective, virtual assistant working around the clock, allowing you to allocate your resources more efficiently. ChatGPT won’t ask for a raise or take coffee breaks, making it a budget-friendly addition to your customer support team.
Now that we’ve established the benefits, let’s dive into the step-by-step guide on how to make this AI magic happen on your website.
To sum it up
In addition to increasing personalisation efforts and guaranteeing a flawless user experience, a ChatGPT integration can help you save money. It seems obvious to me that adding a ChatGPT integration is essential.
Introducing ChatCube: Your No-Code Solution for a Custom ChatGPT
While exploring the world of AI-powered chatbots, I can’t help but shine a spotlight on ChatCube—a game-changing platform that allows you to create a personalized ChatGPT for your website in minutes, without any coding required.
ChatCube is your secret weapon for taking your website’s conversational experience to the next level. It combines the power of ChatGPT with the ease of a no-code solution, making it the perfect tool for businesses of all sizes looking to enhance user engagement and provide instant support.
With ChatCube, you can train your custom ChatGPT on your website’s content, ensuring that it has an in-depth understanding of your products, services, and company culture. It’s like having a virtual assistant that knows your business inside and out, ready to assist your visitors at any time.
Discover the Magic of ChatCube
One of the standout features of ChatCube is its seamless integration with your existing website. With just a few clicks, you can embed the ChatGPT widget anywhere on your site, allowing your visitors to engage in natural and intuitive conversations.
But that’s not all—ChatCube goes beyond simple chatbot functionality. It offers a range of powerful features designed to help you grow your business:
- Personalized product recommendations based on user preferences
- Intelligent lead generation and qualification
- Seamless handoff to human agents for complex queries
- Detailed analytics and insights to optimize your conversational strategy
Whether you’re a small startup or a large enterprise, ChatCube is the ultimate tool to take your website’s conversational capabilities to new heights.
So, are you ready to join the AI revolution and create your own custom ChatGPT? With ChatCube, it’s never been easier. Sign up for free today and experience the magic of personalized, AI-powered conversations on your website.
Don’t miss out on this opportunity to transform the way you engage with your audience online. ChatCube is here to help you unlock the full potential of AI chatbots and take your business to the next level.
Get started with ChatCube now and see the difference a custom ChatGPT can make for your website. Your visitors will thank you for it!
Precursors for ChatGPT Integration
I know you’re looking at integrating ChatGPT into your everyday workflows. But before we get there we need to set up the API keys.
Let’s go
Get API keys from OpenAI
To integrate ChatGPT into your website, you’ll need to obtain API keys from OpenAI. These keys serve as a secure way to authenticate your requests and access the ChatGPT API. Think of the key as the password that your system will use to talk to OpenAI.
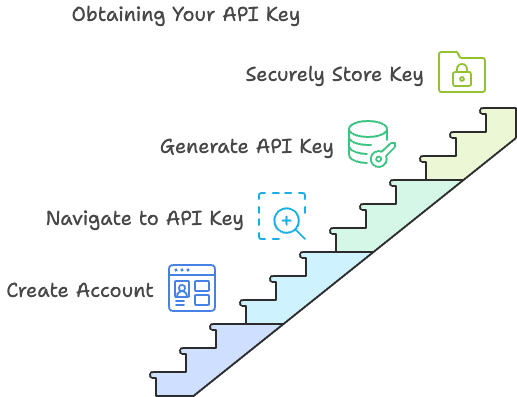
Here’s a step-by-step guide on how to get your API keys:
- Create an OpenAI Account: If you don’t already have an account with OpenAI, head over to their website (https://platform.openai.com/) and sign up. You’ll need to provide some basic information and verify your email address.
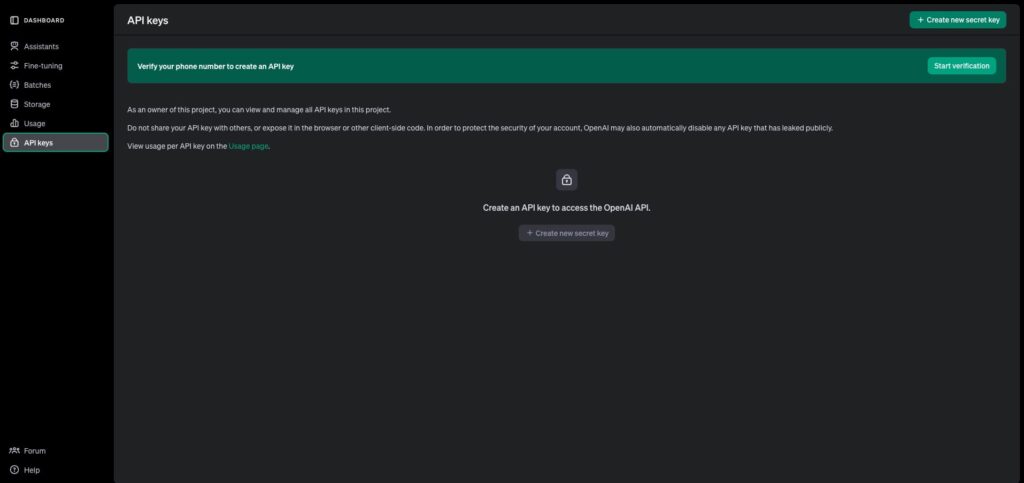
- Navigate to the API Keys Section: Once you’re logged in, click on your profile icon in the top-right corner of the screen and select “View API Keys” from the dropdown menu. This will take you to the API keys management page.
- Create a New API Key: On the API keys page, click on the “Create API Key” button. You’ll be prompted to provide a name for your key. Choose a descriptive name that reflects the purpose of the key, such as “ChatGPT Integration.”
- Copy and Securely Store Your API Key: After creating the key, you’ll see it displayed on the screen. Make sure to copy the key and store it securely. You won’t be able to view the key again once you navigate away from this page, so it’s crucial to save it in a safe place. Important: Keep your API key confidential and never share it publicly. Treat it like a password, as anyone with access to your API key can make requests on your behalf and potentially incur charges or misuse the API.
- Set Up API Key Restrictions (Optional): OpenAI allows you to set up restrictions on your API keys to enhance security. You can specify allowed IP addresses, set rate limits, or restrict access to specific API endpoints. Consider setting up these restrictions based on your specific requirements and security needs.
With your OpenAI API key in hand, you’re now ready to proceed with the ChatGPT integration process. In the next step, we’ll explore how to set up the necessary environment and start making API requests to interact with ChatGPT.
Remember to keep your API key secure throughout the integration process and never expose it in any public-facing code or repositories. Treat it as sensitive information, just like you would with any other authentication credential like your password.
Actually Integrating ChatGPT
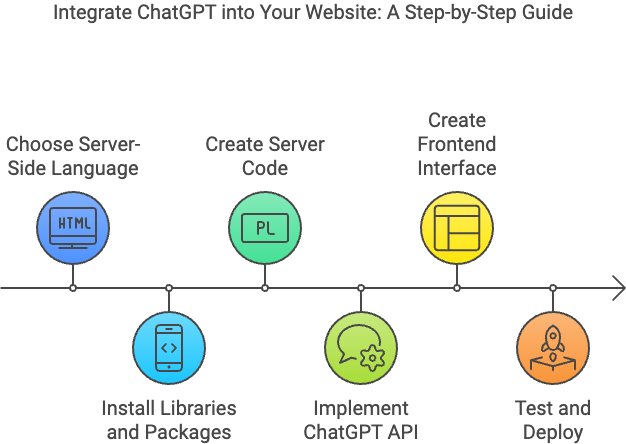
Step 1: Set Up Your Server
Now that you have your API keys, it’s time to set up your server. This is where the magic happens behind the scenes.
- Choose your preferred server-side language. Whether you’re a Python pro, a Node.js ninja, or a PHP phenom, pick the one that makes your heart sing.
- Install the necessary libraries and packages for your chosen language. For example, if you’re using Python, you might want to cozy up with the
openaiandflasklibraries. - Create a new file for your server code. Give it a witty name like
chatgpt_magic.pyorconversation_central.js—because why not? - In your server code, import the required libraries and set up your API credentials. It’s like giving your server the secret handshake to access ChatGPT’s powers.
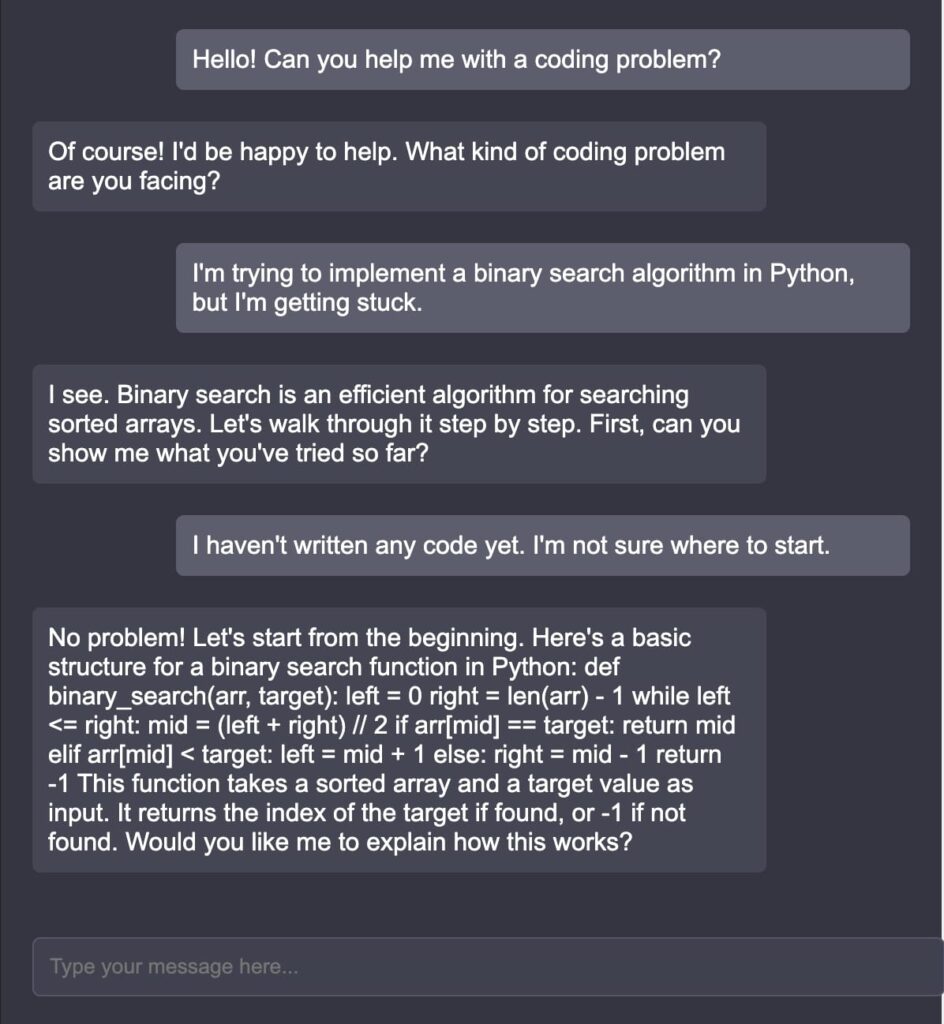
Step 2: Implement the ChatGPT API
Now, let’s get down to the nitty-gritty of integrating ChatGPT into your website. This is where your server code becomes the bridge between your website and the ChatGPT API.
- Create a function or endpoint in your server code that accepts user input from your website. This is like the friendly receptionist that greets your users’ messages.
- Inside that function, make an API call to the ChatGPT API using your API keys. Pass along the user’s message as the prompt. It’s like sending a carrier pigeon to ChatGPT’s headquarters!
- Receive the response from the ChatGPT API and process it in your server code. You can add your own special sauce here, like filtering out any inappropriate content or adding some extra sparkle to the responses.
- Send the processed response back to your website to be displayed to the user. It’s like the grand reveal of ChatGPT’s witty and insightful reply!
Step 3: Create the Frontend Interface
Now that your server is all set up and ready to chat, it’s time to create the frontend interface for your users. This is where you get to unleash your creative genius and design a chat interface that’s both functional and fabulous.
- Create a new HTML file for your chat interface. Give it a name that screams “I’m ready to chat!” like
chat.htmlorconversation_hub.html. - Use your favorite frontend technologies like HTML, CSS, and JavaScript to design and structure your chat interface. Make it intuitive, visually appealing, and maybe even add a few animated flourishes—because who doesn’t love a little pizzazz?
- Implement the necessary JavaScript code to handle user input and send it to your server endpoint. This is like the secret messenger that carries your users’ messages to ChatGPT.
- Set up your frontend code to receive the responses from your server and display them in the chat interface. It’s like the grand unveiling of ChatGPT’s wisdom, right there on your website!
Step 4: Test and Deploy
You’ve made it to the final stretch, my intrepid integrator! It’s time to test your ChatGPT integration and deploy it to the world.
- Run your server code and open your chat interface in a web browser. Type in a few messages and make sure ChatGPT responds with its signature wit and intelligence. If it does, give yourself a well-deserved high-five!
- If everything looks good, it’s time to deploy your ChatGPT integration to your live website. Upload your server code to your hosting platform and make sure your chat interface is accessible to your users.
- Sit back, relax, and watch as your users engage in delightful conversations with ChatGPT. It’s like watching a beautiful friendship blossom, except one of the friends is an AI language model!
And there you have it, folks—a step-by-step guide to integrating ChatGPT into your website
Examples of Successful ChatGPT Integrations
To inspire you and showcase the potential of ChatGPT integration, let’s take a look at a few real-world examples of websites that have successfully integrated ChatGPT:
- Duolingo: The popular language learning platform Duolingo has integrated ChatGPT to provide personalized language practice and conversation simulations. Users can engage in realistic dialogues with ChatGPT, helping them improve their language skills in a fun and interactive way.
- Shopify: The e-commerce giant Shopify has integrated ChatGPT into its platform to assist online store owners with various tasks. ChatGPT can provide product recommendations, answer customer inquiries, and even generate product descriptions, enhancing the overall shopping experience.
- Notion: The productivity and collaboration tool Notion has leveraged ChatGPT to create an AI-powered writing assistant. Users can engage with ChatGPT to get help with brainstorming ideas, structuring documents, and even generating content snippets, making the writing process more efficient and creative.
These examples demonstrate how ChatGPT can be seamlessly integrated into different types of websites to provide personalized assistance, improve user engagement, and streamline various tasks. Draw inspiration from these successful integrations and think about how ChatGPT can enhance your own website’s user experience.
Finally…
Congratulations! You’ve made it through this comprehensive guide on how and where to integrate ChatGPT on your website.
Integrating ChatGPT into your website is not just about keeping up with the latest tech trends; it’s about revolutionizing the way you engage with your visitors and provide them with a truly remarkable user experience. Whether you’re aiming to improve customer support, offer personalized recommendations, or simply add a touch of AI magic to your website, ChatGPT has you covered.
Remember, the journey doesn’t end with the integration. Continuously monitor, refine, and improve ChatGPT based on user interactions and feedback. Stay proactive in ensuring the security and privacy of user data, and always strive to provide the best possible experience for your website visitors.
So, go forth, my fellow business owners and tech enthusiasts! Integrate ChatGPT with confidence, and watch as your website transforms into an interactive hub of intelligent conversations and delightful user experiences.
Remember
The future of web interactions is here, and you’re at the forefront of this thrilling revolution.
Happy integrating, and may your ChatGPT-powered website be a resounding success!